


In this blog, we provide examples of how to get started with PatchTST. We first demonstrate the forecasting capability of PatchTST on the Electricity data. We will then demonstrate the transfer learning capability of PatchTST by using the previously trained model to do zero-shot forecasting on the electrical transformer (ETTh1) dataset. The zero-shot forecasting
performance will denote the test performance of the model in the target domain, without any
training on the target domain. Subsequently, we will do linear probing and (then) finetuning of
the pretrained model on the train part of the target data, and will validate the forecasting
performance on the test part of the target data.
The PatchTST model was proposed in A Time Series is Worth 64 Words: Long-term Forecasting with Transformers by Yuqi Nie, Nam H. Nguyen, Phanwadee Sinthong, Jayant Kalagnanam and presented at ICLR 2023.
Quick overview of PatchTST
At a high level, the model vectorizes individual time series in a batch into patches of a given size and encodes the resulting sequence of vectors via a Transformer that then outputs the prediction length forecast via an appropriate head.
The model is based on two key components:
- segmentation of time series into subseries-level patches which serve as input tokens to the Transformer;
- channel-independence where each channel contains a single univariate time series that shares the same embedding and Transformer weights across all the series, i.e. a global univariate model.
The patching design naturally has three-fold benefit:
- local semantic information is retained in the embedding;
- computation and memory usage of the attention maps are quadratically reduced given the same look-back window via strides between patches; and
- the model can attend longer history via a trade-off between the patch length (input vector size) and the context length (number of sequences).
In addition, PatchTST has a modular design to seamlessly support masked time series pre-training as well as direct time series forecasting.
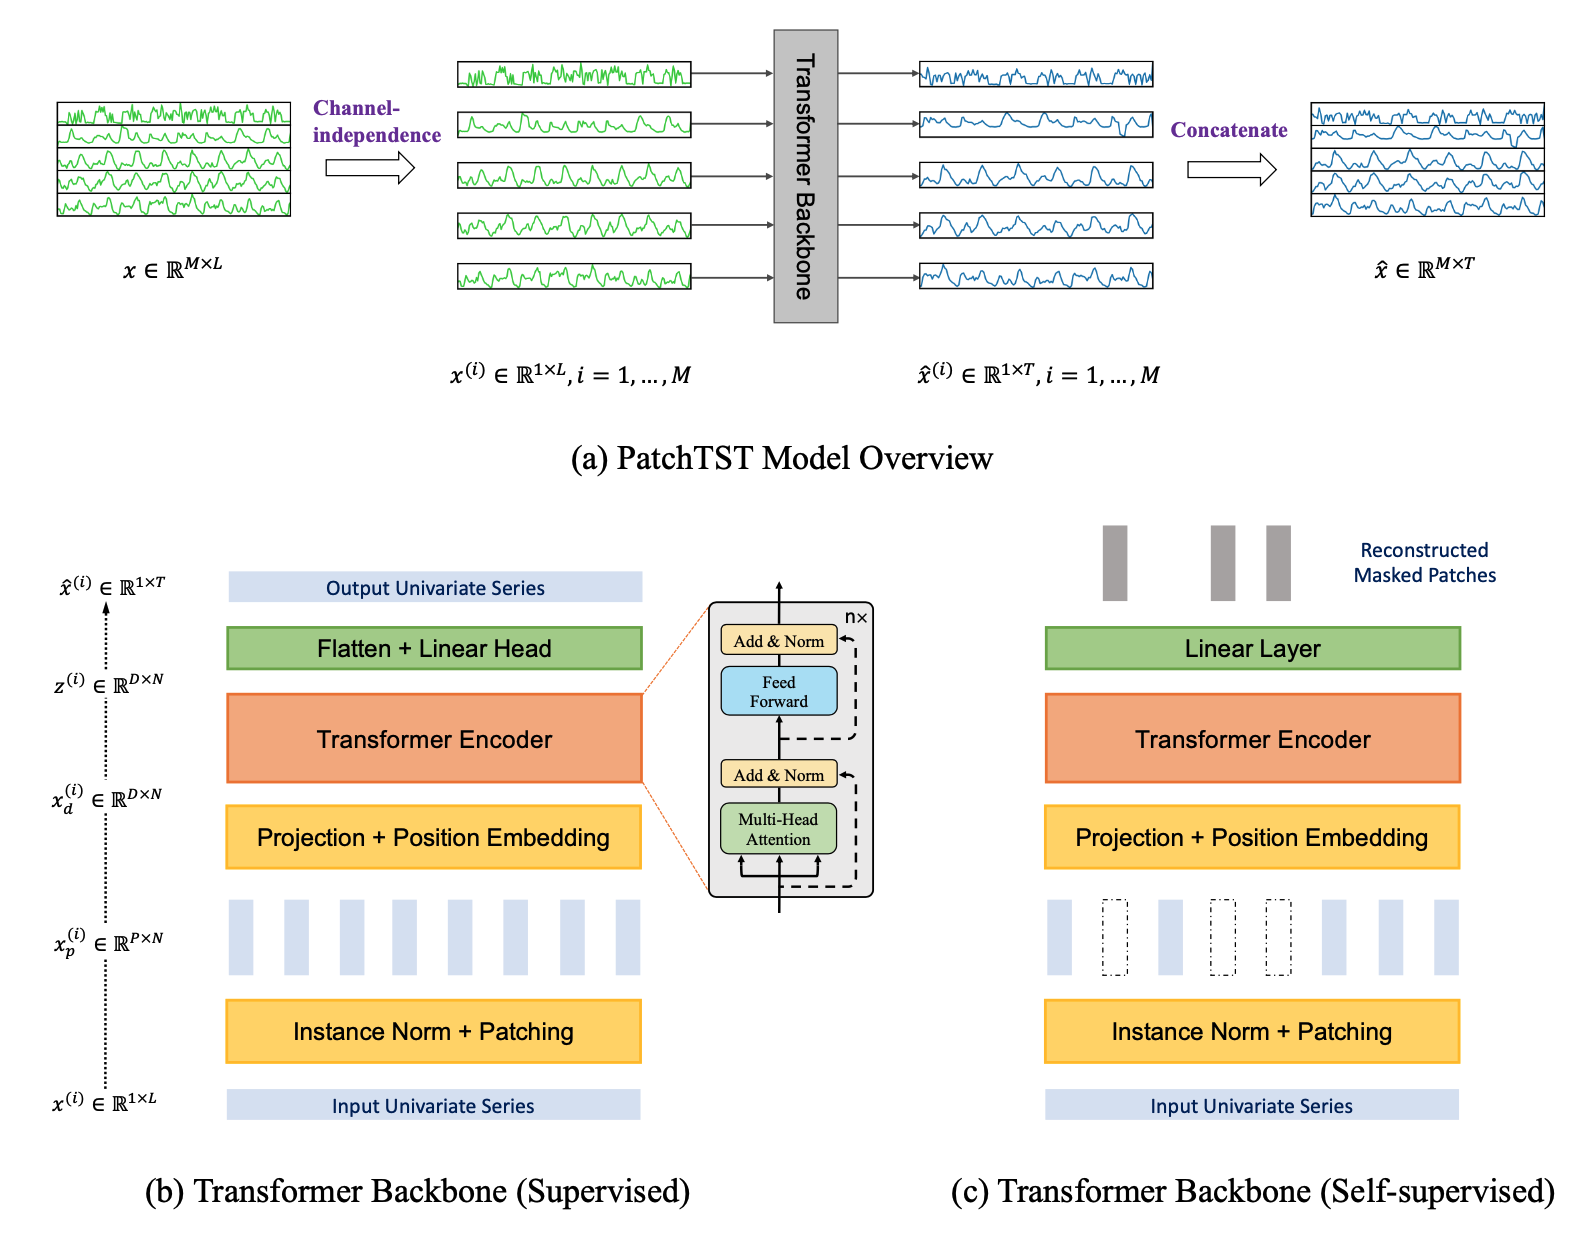 |
|---|
| (a) PatchTST model overview where a batch of time series each of length are processed independently (by reshaping them into the batch dimension) via a Transformer backbone and then reshaping the resulting batch back into series of prediction length . Each univariate series can be processed in a supervised fashion (b) where the patched set of vectors is used to output the full prediction length or in a self-supervised fashion (c) where masked patches are predicted. |
Installation
This demo requires Hugging Face Transformers for the model, and the IBM tsfm package for auxiliary data pre-processing.
We can install both by cloning the tsfm repository and following the below steps.
- Clone the public IBM Time Series Foundation Model Repository
tsfm.pip install git+https://github.com/IBM/tsfm.git - Install Hugging Face
Transformerspip install transformers - Test it with the following commands in a
pythonterminal.from transformers import PatchTSTConfig from tsfm_public.toolkit.dataset import ForecastDFDataset
Part 1: Forecasting on the Electricity dataset
Here we train a PatchTST model directly on the Electricity dataset (available from https://github.com/zhouhaoyi/Informer2020), and evaluate its performance.
import os


from transformers import (
    EarlyStoppingCallback,
    PatchTSTConfig,
    PatchTSTForPrediction,
    Trainer,
    TrainingArguments,
)
import numpy as np
import pandas as pd


from tsfm_public.toolkit.dataset import ForecastDFDataset
from tsfm_public.toolkit.time_series_preprocessor import TimeSeriesPreprocessor
from tsfm_public.toolkit.util import select_by_index
Set seed
from transformers import set_seed

set_seed(2023)
Load and prepare datasets
In the next cell, please adjust the following parameters to suit your application:
dataset_path: path to local .csv file, or web address to a csv file for the data of interest. Data is loaded with pandas, so anything supported by
pd.read_csvis supported: (https://pandas.pydata.org/pandas-docs/stable/reference/api/pandas.read_csv.html).timestamp_column: column name containing timestamp information, useNoneif there is no such column.id_columns: List of column names specifying the IDs of different time series. If no ID column exists, use[].forecast_columns: List of columns to be modeledcontext_length: The amount of historical data used as input to the model. Windows of the input time series data with length equal tocontext_lengthwill be extracted from the input dataframe. In the case of a multi-time series dataset, the context windows will be created so that they are contained within a single time series (i.e., a single ID).forecast_horizon: Number of timestamps to forecast in the future.train_start_index,train_end_index: the start and end indices in the loaded data which delineate the training data.valid_start_index,eval_end_index: the start and end indices in the loaded data which delineate the validation data.test_start_index,eval_end_index: the start and end indices in the loaded data which delineate the test data.patch_length: The patch length for thePatchTSTmodel. It is recommended to choose a value that evenly dividescontext_length.num_workers: Number of CPU workers in the PyTorch dataloader.batch_size: Batch size.
The data is first loaded into a Pandas dataframe and split into training, validation, and test parts. Then the Pandas dataframes are converted to the appropriate PyTorch dataset required for training.
dataset_path = "~/data/ECL.csv"
timestamp_column = "date"
id_columns = []

context_length = 512
forecast_horizon = 96
patch_length = 16
num_workers = 16
batch_size = 64
data = pd.read_csv(
    dataset_path,
    parse_dates=[timestamp_column],
)
forecast_columns = list(data.columns[1:])


num_train = int(len(data) * 0.7)
num_test = int(len(data) * 0.2)
num_valid = len(data) - num_train - num_test
border1s = [
    0,
    num_train - context_length,
    len(data) - num_test - context_length,
]
border2s = [num_train, num_train + num_valid, len(data)]

train_start_index = border1s[0]
train_end_index = border2s[0]


valid_start_index = border1s[1]
valid_end_index = border2s[1]

test_start_index = border1s[2]
test_end_index = border2s[2]

train_data = select_by_index(
    data,
    id_columns=id_columns,
    start_index=train_start_index,
    end_index=train_end_index,
)
valid_data = select_by_index(
    data,
    id_columns=id_columns,
    start_index=valid_start_index,
    end_index=valid_end_index,
)
test_data = select_by_index(
    data,
    id_columns=id_columns,
    start_index=test_start_index,
    end_index=test_end_index,
)

time_series_preprocessor = TimeSeriesPreprocessor(
    timestamp_column=timestamp_column,
    id_columns=id_columns,
    input_columns=forecast_columns,
    output_columns=forecast_columns,
    scaling=True,
)
time_series_preprocessor = time_series_preprocessor.train(train_data)
train_dataset = ForecastDFDataset(
    time_series_preprocessor.preprocess(train_data),
    id_columns=id_columns,
    timestamp_column="date",
    input_columns=forecast_columns,
    output_columns=forecast_columns,
    context_length=context_length,
    prediction_length=forecast_horizon,
)
valid_dataset = ForecastDFDataset(
    time_series_preprocessor.preprocess(valid_data),
    id_columns=id_columns,
    timestamp_column="date",
    input_columns=forecast_columns,
    output_columns=forecast_columns,
    context_length=context_length,
    prediction_length=forecast_horizon,
)
test_dataset = ForecastDFDataset(
    time_series_preprocessor.preprocess(test_data),
    id_columns=id_columns,
    timestamp_column="date",
    input_columns=forecast_columns,
    output_columns=forecast_columns,
    context_length=context_length,
    prediction_length=forecast_horizon,
)
Configure the PatchTST model
Next, we instantiate a randomly initialized PatchTST model with a configuration. The settings below control the different hyperparameters related to the architecture.
num_input_channels: the number of input channels (or dimensions) in the time series data. This is
automatically set to the number for forecast columns.context_length: As described above, the amount of historical data used as input to the model.patch_length: The length of the patches extracted from the context window (of lengthcontext_length).patch_stride: The stride used when extracting patches from the context window.random_mask_ratio: The fraction of input patches that are completely masked for pretraining the model.d_model: Dimension of the transformer layers.num_attention_heads: The number of attention heads for each attention layer in the Transformer encoder.num_hidden_layers: The number of encoder layers.ffn_dim: Dimension of the intermediate (often referred to as feed-forward) layer in the encoder.dropout: Dropout probability for all fully connected layers in the encoder.head_dropout: Dropout probability used in the head of the model.pooling_type: Pooling of the embedding."mean","max"andNoneare supported.channel_attention: Activate the channel attention block in the Transformer to allow channels to attend to each other.scaling: Whether to scale the input targets via “mean” scaler, “std” scaler, or no scaler ifNone. IfTrue, the
scaler is set to"mean".loss: The loss function for the model corresponding to thedistribution_outputhead. For parametric
distributions it is the negative log-likelihood ("nll") and for point estimates it is the mean squared
error"mse".pre_norm: Normalization is applied before self-attention if pre_norm is set toTrue. Otherwise, normalization is
applied after residual block.norm_type: Normalization at each Transformer layer. Can be"BatchNorm"or"LayerNorm".
For full details on the parameters, we refer to the documentation.
config = PatchTSTConfig(
    num_input_channels=len(forecast_columns),
    context_length=context_length,
    patch_length=patch_length,
    patch_stride=patch_length,
    prediction_length=forecast_horizon,
    random_mask_ratio=0.4,
    d_model=128,
    num_attention_heads=16,
    num_hidden_layers=3,
    ffn_dim=256,
    dropout=0.2,
    head_dropout=0.2,
    pooling_type=None,
    channel_attention=False,
    scaling="std",
    loss="mse",
    pre_norm=True,
    norm_type="batchnorm",
)
model = PatchTSTForPrediction(config)
Train model
Next, we can leverage the Hugging Face Trainer class to train the model based on the direct forecasting strategy. We first define the TrainingArguments which lists various hyperparameters for training such as the number of epochs, learning rate and so on.
training_args = TrainingArguments(
    output_dir="./checkpoint/patchtst/electricity/pretrain/output/",
    overwrite_output_dir=True,

    num_train_epochs=100,
    do_eval=True,
    evaluation_strategy="epoch",
    per_device_train_batch_size=batch_size,
    per_device_eval_batch_size=batch_size,
    dataloader_num_workers=num_workers,
    save_strategy="epoch",
    logging_strategy="epoch",
    save_total_limit=3,
    logging_dir="./checkpoint/patchtst/electricity/pretrain/logs/",
    load_best_model_at_end=True,
    metric_for_best_model="eval_loss",
    greater_is_better=False,
    label_names=["future_values"],
)


early_stopping_callback = EarlyStoppingCallback(
    early_stopping_patience=10,
    early_stopping_threshold=0.0001,
)


trainer = Trainer(
    model=model,
    args=training_args,
    train_dataset=train_dataset,
    eval_dataset=valid_dataset,
    callbacks=[early_stopping_callback],

)


trainer.train()
| Epoch | Training Loss | Validation Loss |
|---|---|---|
| 1 | 0.455400 | 0.215057 |
| 2 | 0.241000 | 0.179336 |
| 3 | 0.209000 | 0.158522 |
| … | … | … |
| 83 | 0.128000 | 0.111213 |
Evaluate the model on the test set of the source domain
Next, we can leverage trainer.evaluate() to calculate test metrics. While this is not the target metric to judge in this task, it provides a reasonable check that the pretrained model has trained properly.
Note that the training and evaluation loss for PatchTST is the Mean Squared Error (MSE) loss. Hence, we do not separately compute the MSE metric in any of the following evaluation experiments.
results = trainer.evaluate(test_dataset)
print("Test result:")
print(results)

>>> Test result:
    {'eval_loss': 0.1316315233707428, 'eval_runtime': 5.8077, 'eval_samples_per_second': 889.332, 'eval_steps_per_second': 3.616, 'epoch': 83.0}
The MSE of 0.131 is very close to the value reported for the Electricity dataset in the original PatchTST paper.
Save model
save_dir = "patchtst/electricity/model/pretrain/"
os.makedirs(save_dir, exist_ok=True)
trainer.save_model(save_dir)
Part 2: Transfer Learning from Electricity to ETTh1
In this section, we will demonstrate the transfer learning capability of the PatchTST model.
We use the model pre-trained on the Electricity dataset to do zero-shot forecasting on the ETTh1 dataset.
By Transfer Learning, we mean that we first pretrain the model for a forecasting task on a source dataset (which we did above on the Electricity dataset). Then, we will use the pretrained model for zero-shot forecasting on a target dataset. By zero-shot, we mean that we test the performance in the target domain without any additional training. We hope that the model gained enough knowledge from pretraining which can be transferred to a different dataset.
Subsequently, we will do linear probing and (then) finetuning of the pretrained model on the train split of the target data and will validate the forecasting performance on the test split of the target data. In this example, the source dataset is the Electricity dataset and the target dataset is ETTh1.
Transfer learning on ETTh1 data.
All evaluations are on the test part of the ETTh1 data.
Step 1: Directly evaluate the electricity-pretrained model. This is the zero-shot performance.
Step 2: Evaluate after doing linear probing.
Step 3: Evaluate after doing full finetuning.
Load ETTh dataset
Below, we load the ETTh1 dataset as a Pandas dataframe. Next, we create 3 splits for training, validation, and testing. We then leverage the TimeSeriesPreprocessor class to prepare each split for the model.
dataset = "ETTh1"
print(f"Loading target dataset: {dataset}")
dataset_path = f"https://raw.githubusercontent.com/zhouhaoyi/ETDataset/main/ETT-small/{dataset}.csv"
timestamp_column = "date"
id_columns = []
forecast_columns = ["HUFL", "HULL", "MUFL", "MULL", "LUFL", "LULL", "OT"]
train_start_index = None
train_end_index = 12 * 30 * 24


valid_start_index = 12 * 30 * 24 - context_length
valid_end_index = 12 * 30 * 24 + 4 * 30 * 24

test_start_index = 12 * 30 * 24 + 4 * 30 * 24 - context_length
test_end_index = 12 * 30 * 24 + 8 * 30 * 24

>>> Loading target dataset: ETTh1
data = pd.read_csv(
    dataset_path,
    parse_dates=[timestamp_column],
)

train_data = select_by_index(
    data,
    id_columns=id_columns,
    start_index=train_start_index,
    end_index=train_end_index,
)
valid_data = select_by_index(
    data,
    id_columns=id_columns,
    start_index=valid_start_index,
    end_index=valid_end_index,
)
test_data = select_by_index(
    data,
    id_columns=id_columns,
    start_index=test_start_index,
    end_index=test_end_index,
)

time_series_preprocessor = TimeSeriesPreprocessor(
    timestamp_column=timestamp_column,
    id_columns=id_columns,
    input_columns=forecast_columns,
    output_columns=forecast_columns,
    scaling=True,
)
time_series_preprocessor = time_series_preprocessor.train(train_data)
train_dataset = ForecastDFDataset(
    time_series_preprocessor.preprocess(train_data),
    id_columns=id_columns,
    input_columns=forecast_columns,
    output_columns=forecast_columns,
    context_length=context_length,
    prediction_length=forecast_horizon,
)
valid_dataset = ForecastDFDataset(
    time_series_preprocessor.preprocess(valid_data),
    id_columns=id_columns,
    input_columns=forecast_columns,
    output_columns=forecast_columns,
    context_length=context_length,
    prediction_length=forecast_horizon,
)
test_dataset = ForecastDFDataset(
    time_series_preprocessor.preprocess(test_data),
    id_columns=id_columns,
    input_columns=forecast_columns,
    output_columns=forecast_columns,
    context_length=context_length,
    prediction_length=forecast_horizon,
)
Zero-shot forecasting on ETTH
As we are going to test forecasting performance out-of-the-box, we load the model which we pretrained above.
finetune_forecast_model = PatchTSTForPrediction.from_pretrained(
    "patchtst/electricity/model/pretrain/",
    num_input_channels=len(forecast_columns),
    head_dropout=0.7,
)
finetune_forecast_args = TrainingArguments(
    output_dir="./checkpoint/patchtst/transfer/finetune/output/",
    overwrite_output_dir=True,
    learning_rate=0.0001,
    num_train_epochs=100,
    do_eval=True,
    evaluation_strategy="epoch",
    per_device_train_batch_size=batch_size,
    per_device_eval_batch_size=batch_size,
    dataloader_num_workers=num_workers,
    report_to="tensorboard",
    save_strategy="epoch",
    logging_strategy="epoch",
    save_total_limit=3,
    logging_dir="./checkpoint/patchtst/transfer/finetune/logs/",
    load_best_model_at_end=True,
    metric_for_best_model="eval_loss",
    greater_is_better=False,
    label_names=["future_values"],
)


early_stopping_callback = EarlyStoppingCallback(
    early_stopping_patience=10,
    early_stopping_threshold=0.001,
)

finetune_forecast_trainer = Trainer(
    model=finetune_forecast_model,
    args=finetune_forecast_args,
    train_dataset=train_dataset,
    eval_dataset=valid_dataset,
    callbacks=[early_stopping_callback],
)

print("\n\nDoing zero-shot forecasting on target data")
result = finetune_forecast_trainer.evaluate(test_dataset)
print("Target data zero-shot forecasting result:")
print(result)

>>> Doing zero-shot forecasting on target data

    Target data zero-shot forecasting result:
    {'eval_loss': 0.3728715181350708, 'eval_runtime': 0.95, 'eval_samples_per_second': 2931.527, 'eval_steps_per_second': 11.579}
As can be seen, with a zero-shot forecasting approach we obtain an MSE of 0.370 which is near to the state-of-the-art result in the original PatchTST paper.
Next, let’s see how we can do by performing linear probing, which involves training a linear layer on top of a frozen pre-trained model. Linear probing is often done to test the performance of features of a pretrained model.
Linear probing on ETTh1
We can do a quick linear probing on the train part of the target data to see any possible test performance improvement.
for param in finetune_forecast_trainer.model.model.parameters():
    param.requires_grad = False

print("\n\nLinear probing on the target data")
finetune_forecast_trainer.train()
print("Evaluating")
result = finetune_forecast_trainer.evaluate(test_dataset)
print("Target data head/linear probing result:")
print(result)

>>> Linear probing on the target data
| Epoch | Training Loss | Validation Loss |
|---|---|---|
| 1 | 0.384600 | 0.688319 |
| 2 | 0.374200 | 0.678159 |
| 3 | 0.368400 | 0.667633 |
| … | … | … |
>>> Evaluating

    Target data head/linear probing result:
    {'eval_loss': 0.35652095079421997, 'eval_runtime': 1.1537, 'eval_samples_per_second': 2413.986, 'eval_steps_per_second': 9.535, 'epoch': 18.0}
As can be seen, by only training a simple linear layer on top of the frozen backbone, the MSE decreased from 0.370 to 0.357, beating the originally reported results!
save_dir = f"patchtst/electricity/model/transfer/{dataset}/model/linear_probe/"
os.makedirs(save_dir, exist_ok=True)
finetune_forecast_trainer.save_model(save_dir)

save_dir = f"patchtst/electricity/model/transfer/{dataset}/preprocessor/"
os.makedirs(save_dir, exist_ok=True)
time_series_preprocessor = time_series_preprocessor.save_pretrained(save_dir)
Finally, let’s see if we can get additional improvements by doing a full fine-tune of the model.
Full fine-tune on ETTh1
We can do a full model fine-tune (instead of probing the last linear layer as shown above) on the train part of the target data to see a possible test performance improvement. The code looks similar to the linear probing task above, except that we are not freezing any parameters.
finetune_forecast_model = PatchTSTForPrediction.from_pretrained(
    "patchtst/electricity/model/pretrain/",
    num_input_channels=len(forecast_columns),
    dropout=0.7,
    head_dropout=0.7,
)
finetune_forecast_trainer = Trainer(
    model=finetune_forecast_model,
    args=finetune_forecast_args,
    train_dataset=train_dataset,
    eval_dataset=valid_dataset,
    callbacks=[early_stopping_callback],
)
print("\n\nFinetuning on the target data")
finetune_forecast_trainer.train()
print("Evaluating")
result = finetune_forecast_trainer.evaluate(test_dataset)
print("Target data full finetune result:")
print(result)

>>> Finetuning on the target data
| Epoch | Training Loss | Validation Loss |
|---|---|---|
| 1 | 0.348600 | 0.709915 |
| 2 | 0.328800 | 0.706537 |
| 3 | 0.319700 | 0.741892 |
| … | … | … |
>>> Evaluating

    Target data full finetune result:
    {'eval_loss': 0.354232519865036, 'eval_runtime': 1.0715, 'eval_samples_per_second': 2599.18, 'eval_steps_per_second': 10.266, 'epoch': 12.0}
In this case, there is only a small improvement on the ETTh1 dataset with full fine-tuning. For other datasets there may be more substantial improvements. Let’s save the model anyway.
save_dir = f"patchtst/electricity/model/transfer/{dataset}/model/fine_tuning/"
os.makedirs(save_dir, exist_ok=True)
finetune_forecast_trainer.save_model(save_dir)
Summary
In this blog, we presented a step-by-step guide on training PatchTST for tasks related to forecasting and transfer learning, demonstrating various approaches for fine-tuning. We intend to facilitate easy integration of the PatchTST HF model for your forecasting use cases, and we hope that this content serves as a useful resource to expedite the adoption of PatchTST. Thank you for tuning in to our blog, and we hope you find this information beneficial for your projects.
